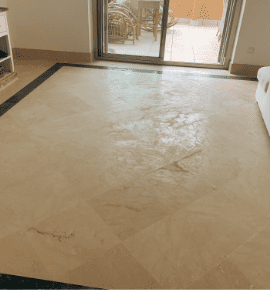
Before
This dead salty floor looked sad when we arrived. The owners wondered if it would ever look good again.
Are your marble floors in need of some TLC? Whether you're a homeowner or a professional in the flooring industry, knowing how to properly sand and restore marble is essential. In this ultimate guide, we'll walk you through the best floor sanding techniques and share insider tips to help you achieve stunning results. Marble is a timeless and elegant flooring material that can add character and beauty to any space. But over time, it can become dull, scratched, or damaged due to heavy foot traffic, spills, or improper maintenance. Floor sanding is a crucial step in the restoration process as it helps to remove imperfections, level the surface, and bring back the natural shine of your marble floors. From choosing the right sanding equipment and abrasives to mastering the correct sanding techniques, we've got you covered. We'll also delve into the importance of proper preparation, sanding grit selection, and finishing techniques for a truly professional and long-lasting result. So, get ready to restore your marble floors to their former glory with our comprehensive guide to floor sanding techniques and tips.
Benefits of floor sanding
Sanding your marble floors offers several benefits that go beyond restoring their appearance. First and foremost, sanding can help to remove deep scratches, stains, and imperfections that may have accumulated over time. By leveling the surface, sanding provides a smooth and even base for further treatments such as polishing or sealing. In addition to improving the aesthetics of your marble floors, sanding also enhances their durability. By removing the worn-out top layer, sanding exposes fresh marble that is more resistant to future wear and tear. This can significantly extend the lifespan of your floors and save you money in the long run. Moreover, sanding allows you to customize the look of your marble floors. Depending on the grit of sandpaper you use, you can achieve different levels of smoothness and shine. This flexibility allows you to create a floor that perfectly matches your personal style and complements the overall design of your space.
Common floor sanding mistakes to avoid
While floor sanding can be a rewarding process, there are some common mistakes that you should avoid to ensure the best results. One of the most prevalent mistakes is not properly preparing the floor before sanding. This includes removing any furniture, rugs, or other obstacles that may hinder the sanding process. It's also crucial to thoroughly clean the floor to remove any dirt or debris that could scratch the surface during sanding. Another mistake to avoid is using the wrong diamond grit. Choosing the correct grit is essential as it determines the level of abrasiveness and the final outcome of the sanding process. Starting with too coarse of a grit can result in unnecessary damage to the marble, while using too fine of a grit may not effectively remove imperfections. It's important to do your research and consult with professionals to determine the best grit for your specific marble floors. Additionally, rushing through the sanding process is a mistake that can lead to subpar results. Take your time and work in small sections to ensure even sanding and a consistent finish. It's also important to regularly check the diamond grit disk for wear and replace it when necessary to maintain optimal performance.
Understanding different types of sanding equipment
Before you start sanding your marble floors, it's essential to familiarize yourself with the different types of sanding equipment available. The two main types of sanders used for marble floor restoration are water sanders and orbital sanders. Water sanders are powerful heavy machines that use a revolving disc that stones or diamond discs are inserted into to sand the floor. They are typically used for initial sanding as they can quickly remove a significant amount of material. However, water sanders require some skill to operate properly, and they can be aggressive on the surface if not used correctly. On the other hand, orbital sanders are more user-friendly and are often used for fine sanding and polishing of edges. They operate in a circular motion and are better suited for removing scratches and achieving a smooth finish. Orbital sanders are also less likely to cause gouges or uneven surfaces, making them a popular choice for DIY enthusiasts and beginners in the flooring industry. When choosing stones or diamond disks for your sanding equipment, you'll come across different grits, ranging from coarse to fine. Coarse-grit disks are typically used for initial sanding to remove deep scratches and imperfections, while medium-grit disks helps to refine the surface and prepare it for the final sanding stages. Fine-grit disks are used for the final sanding to achieve a smooth and polished finish.
Preparing your floor for sanding
Proper preparation is key to achieving the best results when sanding your marble floors. Start by removing all furniture, rugs, and other objects from the room to create a clear workspace. This will allow you to move freely and avoid any potential damage or obstructions during the sanding process. Next, thoroughly clean the floor to remove any dirt, dust, or debris. Use a broom or vacuum cleaner to remove loose particles, and then mop the floor with a mild detergent or stone cleaner. Be sure to let the floor dry completely before proceeding to the sanding stage. It's also important to inspect the floor for any cracks or loose tiles. If you come across any, address them before sanding to ensure a stable and even surface. Cracks can be filled with epoxy or a suitable filler, while loose tiles may need to be reattached or replaced.
Step-by-step guide to sanding your floor
Now that you've prepared your floor, it's time to dive into the sanding process. Follow these step-by-step instructions to achieve professional-grade results:
1. Start with the coarse-grit disks: Attach the appropriate grit disk to your sander, whether it's a water sander or an orbital sander. Begin sanding the floor in a diagonal direction, overlapping each pass to ensure even coverage. Pay extra attention to high-traffic areas and heavily scratched spots.
2. Switch to a medium-grit disk: Once you've completed the initial sanding, switch to a medium-grit disk to refine the surface. Sand the floor in the opposite direction of your initial sanding, again overlapping each pass for consistent results. This step helps to remove any remaining scratches and further level the surface.
3. Proceed with fine-grit disks: For the final sanding, switch to a fine-grit disk to achieve a smooth and polished finish. Sand the floor in the same direction as the medium-grit disk, making sure to cover the entire surface area.
4. Inspect the floor: Once you've completed the sanding process, carefully inspect the floor for any imperfections or areas that may need further attention. Use a rubber blade or cloth to remove any slurry or debris from the surface.
5. Repeat if necessary: Depending on the condition of your marble floors, you may need to repeat the sanding process with finer grit discs to achieve your desired results. This step is optional but can further enhance the smoothness and shine of your floors.
Tips for achieving a smooth and even finish
Achieving a smooth and even finish requires attention to detail and the use of proper techniques. Here are some tips to help you achieve exceptional results:
1. Work in small sections: Sanding in small sections allows for better control and ensures even sanding across the entire floor. Avoid rushing and take your time to achieve the best outcome.
2. Maintain a consistent pressure: Apply consistent pressure while sanding to avoid creating uneven spots or gouges. Let the machine do the work and avoid pressing too hard on the surface.
3. Change disks regularly: Regularly check your disk for wear and replace it when necessary. Worn-out disks can cause uneven sanding and may result in a less polished finish.
4. Use a sanding pattern: Follow a systematic sanding pattern to ensure thorough and even coverage. This can help you avoid missing any areas and achieve a cohesive look.
5. Remove dust or slurry between sanding stages: Use a soft brush or cloth to remove dust and debris between sanding stages. This will help prevent scratches and create a cleaner surface for the next sanding step.
Sealing your sanded floor
Once you've achieved a smooth and even finish, you have the option to further enhance the appearance of your marble floors through sealing. Sealing can add depth and color to your floors, allowing you to customize their look to suit your style and preferences. Before sealing, ensure that the floor is clean and free from any dust or debris. Apply the sealer evenly using a brush or sponge, following the manufacturer's instructions for application and drying times. Once the sealer has dried completely, apply the vitrification liquid to polish the surface and enhance its durability. Choose a sealant specifically designed for marble floors and follow the instructions for application and curing.
Maintaining your sanded floor for long-lasting results
To ensure the longevity and beauty of your sanded marble floors, it's crucial to implement a proper maintenance routine. Here are some tips to help you maintain your floors for long-lasting results:
1. Regularly sweep or vacuum: Remove loose dirt and debris from the surface of your floors to prevent scratching. Use a soft broom or a vacuum cleaner with a brush attachment to avoid damaging the surface.
2. Clean spills immediately: Marble is susceptible to staining, so it's essential to clean up spills as soon as they occur. Use a soft cloth or mop to blot the spill and avoid rubbing, as this can spread the liquid and potentially damage the surface.
3. Use a pH-neutral cleaner: When cleaning your marble floors, opt for a pH-neutral cleaner specifically designed for stone surfaces. Avoid using harsh chemicals or abrasive cleaners that can dull the shine or cause etching.
4. Protect the surface: Place rugs or mats in high-traffic areas, especially near entryways, to protect the surface from dirt and abrasive particles. Use felt pads or coasters under furniture legs to prevent scratching and gouging.
Conclusion: Enjoy your beautifully restored marble floor
With the knowledge and techniques shared in this ultimate guide, you're now equipped to restore your marble floors to their former glory. From choosing the right sanding equipment and abrasives to mastering the correct sanding techniques, you have all the tools you need to achieve stunning results. Remember to take your time, follow the proper steps, and maintain your sanded floor for long-lasting beauty. Enjoy the timeless elegance and natural shine of your beautifully restored marble floor. All equipment can be rented from us and we have all materials needed in stock. If you think that this work is beyond you, please contact us for a free inspection and no obligation quotation.
WhatsApp us.


This dead salty floor looked sad when we arrived. The owners wondered if it would ever look good again.
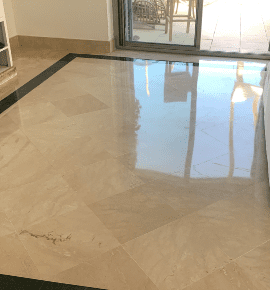
Within a few hours we had it looking as good as new. If you would like your floors looking this good, phone us.
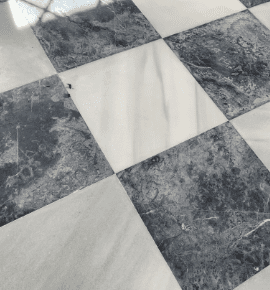
This floor at a property at Mijas Golf was in a sorry state. Water damaged with a heavy calcium deposit.
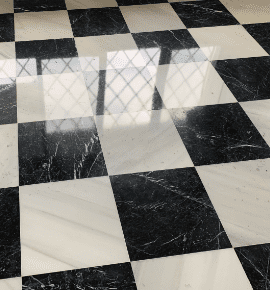
A strong solution of special marble acid was used. Also much time polishing it back to its former glory.
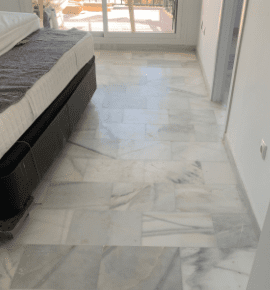
This three bedroom apartment at Mijas Costa had very dirty floors bulders had re-plastered the ceilings.
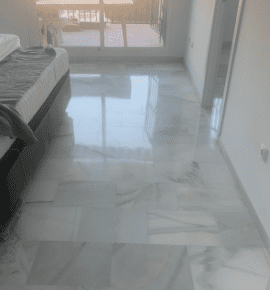
After much cleaning with our large machines we were able to restore the shine to all rooms.
With 37 years EXPERIENCE in polishing marble, you are in good hands.
Free survey, ADVICE and quotation, without obligation..
We are a LOCAL COMPANY and have been here for many years.
We GUARANTEE that all work is carried out to the highest standard.
Even the best cared for floors still become dull over the years. To keep your floors looking good for the longest possible time, follow these simple maintenance tips below…